What do you think of this big end journal?

Peteyoung75

VIP MEMBER
Joined
Oct 5, 2024
Messages
51
Country flag
Hi,
Following posts I made about 88 cranks a while ago I’ve found what seems to be a fairly low mileage crank (relatively). It’s been sat inside a seized engine for decades I think.
I’ve measured the journals and they are bang on 1.5
The machining inside the crank pins is pretty smooth
The journals look horrible as they are stained from being idle in all sorts of conditions for years but I can’t feel any surface defects.
I’d like to keep as much material in the crank pins as possible.
What are peoples thoughts? I’ll probably send it off for magnaflux and polish/grind but would be good to hear what others make of it as I’m relatively inexperienced.
Cheers,
Pete
What do you think of this big end journal?
 
Don’t grind it unless it needs it. Clean and polish the journals then measure them accurately (or get them measured by a pro).
Thats my thinking too. Any recommendations on how to polish them?
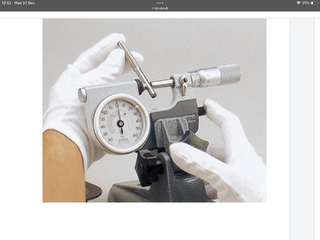
I’ve measured them with a mic. I have gauge blocks and an indicator mic so I’m confident in my measurements.
 
Indicating micrometers have a spring loaded moveable anvil and a built in dial guage. You can set up gauge blocks to the nominal dimension you want to measure and zero the micrometer on the gauge blocks, press a plunger in to move the anvil away from the gauge blocks, move the micrometer to what you’re measuring and release the anvil and read off the variation in dimension from the gauge blocks using the dial gauge. Same as a comparator dial gauge on a stand. Really accurate as using gauge blocks means you have standards bang on the dimension you want to measure.
What do you think of this big end journal?
 
Thanks. Any tips on removing an even amount across and around the journal?
Cut a strip of 1000 grit paper a little narrower than the journal and the full length of the paper. Using some thin oil (maybe WD40), wrap it around then go round and round. If 1000 doesn't clean it, you could try 800, but the goal is not metal removal, but cleaning and polishing.

Since you can't feel anything, if you're sure they are on size, you probably don't need to do more than clean and polish.
 
Last edited:
Cut a strip of 1000 grit paper a little narrower than the journal and the full length of the paper. Using some thin oil (maybe WD40), wrap it around that go round and round. If 1000 doesn't clean it, you could try 800, but the goal is not metal removal, but cleaning and polishing.

Since you can't feel anything, if you're sure they are on size, you probably don't need to do more than clean and polish.
Thanks, I’ll give that a go 👍
 
Get it crack tested, just use a zeroed mic on an oil free surface, it doesn't look too good to me, looking at the Pic, but maybe needs to have an automachinist look at it. Proper polish.
 
Thanks Folks, I know SRM can do magnaflux testing and grind to the correct fillet radius. I’ll see what they say about polishing and maybe get the crank off to them. I want to make sure it is only re ground if it is absolutely necessary. I’m a bit nervous about attacking it with abrasives myself.
 
I’m a bit nervous about attacking it with abrasives myself.
I've also had good luck with some run-of-the-mill metal polish (without a cutting agent) and some flat shoe laces wound around the journal a couple times. Lightly clamp the flywheel in the vise, and pull the shoelace back and forth a few times. You'd really have to go at it for a while before you resize the journal with metal polish and shoelace.

You're only inspecting. Don't go nuts and you'll be fine.
Thanks - that sounds good 👍
 
So I’ve done the shoelace and polish job and there is still some fine pitting and light scratches (still can’t feel any of it). I’ve re measured and I’m now getting between 1 and 6 tenths (converted from microns)
What do you think of this big end journal?
below the minimum of 1.5” for the standard journal size so it looks like it’s off for crack testing and a regrind.
Thanks all 👍
 
So I’ve done the shoelace and polish job and there is still some fine pitting and light scratches (still can’t feel any of it). I’ve re measured and I’m now getting between 1 and 6 tenths (converted from microns) View attachment 123090View attachment 123091View attachment 123092below the minimum of 1.5” for the standard journal size so it looks like it’s off for crack testing and a regrind.
Thanks all 👍
"1 and 6 tenths" and 1.5" do not compute. Just state it in something real and let the reader convert.

To me, "1 and 6 tenths" would mean .0001" to .0006" which is fine.
1.5" means one and a half inches!
 
"1 and 6 tenths" and 1.5" do not compute. Just state it in something real and let the reader convert.

To me, "1 and 6 tenths" would mean .0001" to .0006" which is fine.
1.5" means one and a half inches!
According to the norton manual 1.5000 is the low end of the tolerance for the standard journal diameter. This is where I set my gauge blocks and zero’d the mic. The journal measured up at between 1 and 6 tenths below this so that seems like it’s clearly undersized for standard shells regardless of the surface quality.
To clarify the journal diameter measurements are -
1.4994” - 1.4999”

The limits stated in the manual are -
1.5000”/1.5005”

What do you think of this big end journal?
 
Back
Top